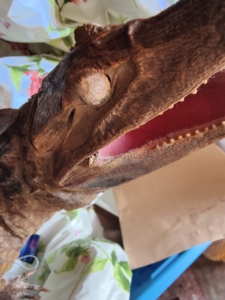
I was recently contacted by a family with a cute, mounted crocodile that had been hanging on the wall for some years. The story goes like this: grandfather was traveling in South America in the 1960’s and traded cigarettes for this small taxidermy crocodile. Ever since, the animal has been part of the family. Though prepared crocodilian skin is basically impervious to everything (the oldest taxidermy specimen in existence now is a crocodile hanging in a church in Italy, prepared in 1534), this particular specimen was showing its age. It was dusty, there was something going on with the eyes, and the object had a few broken bits: cracks, missing teeth, the end of the tail, as well as a few mysterious stains, so the family brought it to me for a bit of restoration and TLC.
The first thing I worked on was the eyes. I started with them because that was the most complicated task (I suspected) and I wasn’t really sure what the problem was. Most taxidermy animals have glass eyes, though I have also seen taxidermy with eyes made from shells, marbles, and even googly eyes! With this specimen, I just couldn’t tell what the eyes were made of, though it appeared the material had corroded over time. Another restaurateur suggested that they might be metal, and to try tapping the eyes with a metal fork. I did this and yes, metal eyes. I suspect brass, but I am still not 100% sure. When I held up a magnet, it didn’t stick so, it wasn’t iron. Regardless, the Dremel drill was the tool to use. I used different heads to remove the corroded bits, and after that, I polished, polished, and then polished some more. After the polishing, I left the eyes unpainted. When I was working with the Dremel, nothing like paint flecks came off, so I feel confident they were never painted to begin with.
Eyes before treatment

Eyes after Treatment
The Dremel was put to work again, this time with soft plastic bristles which I used to clean the whole animal. The bristles work really well getting into crevices at joints. I also removed the stains (I think that they were perhaps house paint) and finished the cleaning by wiping with a soft cloth. I am always amazed when I do restoration work that a good cleaning makes SUCH a huge improvement. Vacuum cleaning for the win.
Next up were the repairs. I used apoxy sculpt to model new teeth, a new tip of the tail and a claw, which were then painted with acrylic paint. The tricky thing about painting taxidermy, or other natural history objects, is that skin is never one color. Painting always requires multiple coats. With the crocodile, I started with a few shades of brown, but in the end added yellow, black, and even green to get a natural look.
The final bit of work was actually not done by me, but by the family that owned the taxidermy crocodile. The front feet had a few missing or twisted toes and claws, and I suggested that I show the owners how to make new crocodile toes themselves. This is not difficult, and it is fun to do.I feel it really gives the family a role in the story of this crocodile. Bonus: it is easier on the budget. I haven’t seen the final result of their work, but I am sure it is beautifully done, and the crocodile is ready to hang on the wall for the next 60 years.

Nice Smile
